React
install
npm install -g create-react-app
create-react-app [appname]
npm run start
两种组件形式
函数型组件 | 基于类组件
import React from "react";

// 函数类型组件
// 一般只进行值的显示 不进行复杂的业务逻辑
// 单项数据流

export function CompType1(props) {
  return <div>CompType1,{props.name}</div>;
}

// 基于类组件
// 必须要用 render 函数
// 复杂的业务逻辑
// 双向数据流

export class CompType2 extends React.Component {
  render() {
    return <div>CompType2,{this.props.name}</div>;
  }
}
简单应用
import React, { Component } from "react";

export default class Clock extends Component {
  // 状态固定名字
  state = {
    date: new Date()
  };

  componentDidMount() {
    this.timer = setInterval(() => {
      this.setState({
        date: new Date()
      });
    }, 1000);
  }

  componentWillUnmount() {
    clearInterval(this.timer);
  }

  render() {
    return <div>{this.state.date.toLocaleTimeString()}</div>;
  }
}
state 和 setSate (状态)
import React, { Component } from "react";

class StateTest extends Component {
  //状态初始化一般放到构造器中
  constructor(props) {
    super(props);
    this.state = { counter: 1 };
  }

  //组件挂载前
  componentDidMount() {
    //函数式写法(推荐)
    this.setState(prevState => {
      return {
        counter: prevState.counter + 1
      };
    });
    this.setState((prevState, props) => {
      return {
        counter: prevState.counter + 1
      };
    });
  }

  render() {
    return <div>{this.state.counter}</div>;
  }
}

export default StateTest;
条件渲染 & 列表渲染 & 事件 & 组件间数据传递
点击事件传值 默认传递的事 event 所以要用箭头函数进行传值
<button onClick={_ => this.addToCart(good)}>加购</button>或
<button onClick={_ => this.addToCart(good,_)}>加购</button>或
<button onClick={() => this.addToCart(good,_)}>加购</button>
组件间传值 可以传递数据 也可以传递方法
<Cart data={this.state.cart} add={this.add} minus={this.minus}></Cart>
ps: react 提倡不直接修改数据
import React, { Component } from "react";
import Cart from "./Cart";

class CartSample extends Component {
  constructor(props) {
    super(props);
    this.state = {
      good: [
        { id: 1, text: "aaaaaa" },
        { id: 2, text: "bbbbbbbb" }
      ],
      text: "",
      cart: []
    };
    this.addGood = this.addGood.bind(this); //添加商品

    //Cart组件
    this.addToCart = this.addToCart.bind(this); //添加至购物车
    this.minus = this.minus.bind(this); //购物车-
    this.add = this.add.bind(this); //购物车+
  }

  textChange = e => {
    this.setState({
      text: e.target.value
    });
  };

  // 添加商品 (推荐在上面this绑定)
  addGood() {
    this.setState(prevState => {
      return {
        good: [
          ...prevState.good,
          {
            id: prevState.good.length + 1,
            text: prevState.text
          }
        ]
      };
    });
  }

  addToCart(good) {
    const newCart = [...this.state.cart];
    const idx = newCart.findIndex(c => c.id === good.id);
    const item = newCart[idx];
    if (item) {
      newCart.splice(idx, 1, { ...item, count: item.count + 1 });
    } else {
      newCart.push({ ...good, count: 1 });
      console.log(newCart);
    }

    this.setState({
      cart: newCart
    });
  }

  minus(id) {
    const newCart = [...this.state.cart];
    const idx = newCart.findIndex(c => c.id === id);
    const item = newCart[idx];
    if (item.count === 1) {
      newCart.splice(idx, 1);
    } else {
      newCart.splice(idx, 1, { ...item, count: item.count - 1 });
    }

    this.setState({
      cart: newCart
    });
  }

  add(id) {
    const newCart = [...this.state.cart];
    const idx = newCart.findIndex(c => c.id === id);
    const item = newCart[idx];
    newCart.splice(idx, 1, { ...item, count: item.count + 1 });

    this.setState({
      cart: newCart
    });
  }

  render() {
    // const title = this.props.title ? <h1>this.props.title</h1> : null

    return (
      <div>
        {/* 短路逻辑写条件渲染 */}
        {this.props.title && <h1>this.props.title</h1>}

        {/* 列表渲染 */}
        <div>
          <input
            type="text"
            value={this.state.text}
            onChange={this.textChange}
          />
          <button onClick={this.addGood}>添加</button>
        </div>
        <ul>
          {this.state.good.map(good => (
            <li key={good.id}>
              {good.text}

              <button onClick={_ => this.addToCart(good)}>加购</button>
            </li>
          ))}
        </ul>

        {/* 购物车 */}
        <Cart data={this.state.cart} add={this.add} minus={this.minus}></Cart>
      </div>
    );
  }
}

export default CartSample;
生命周期
可以通过此图更直观了解流程,具体生命周期看官网
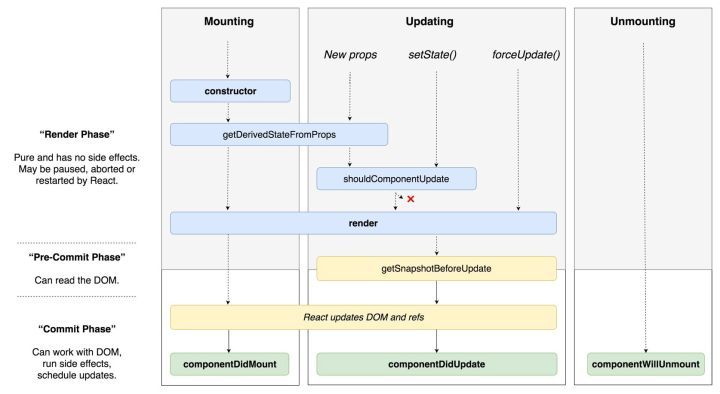
此处版本:16.12
挂载
当组件实例被创建并插入 DOM 中时,其生命周期调用顺序如下:
注意:
下述生命周期方法即将过时,在新代码中应该避免使用它们:
更新
当组件的 props 或 state 发生变化时会触发更新。组件更新的生命周期调用顺序如下:
static getDerivedStateFromProps()shouldComponentUpdate()render()getSnapshotBeforeUpdate()componentDidUpdate()
注意:
下述方法即将过时,在新代码中应该避免使用它们:
卸载
当组件从 DOM 中移除时会调用如下方法:
错误处理
当渲染过程,生命周期,或子组件的构造函数中抛出错误时,会调用如下方法:
ant-design 组件库
安装
 yarn add antd
 npm install antd --save
引入
// 在app.css引入  或在app.js中引入
@import '~antd/dist/antd.css'; || import 'antd/dist/antd.css'

//按需引入组件
import { Button } from 'antd';
按需加载
参考:https://ant.design/docs/react/use-with-create-react-app-cn
yarn add react-app-rewired customize-cra babel-plugin-import根目录下新建:config-overrides.js
const { override, fixBabelImports } = require("customize-cra");

module.exports = override(
  fixBabelImports("import", {
    libraryName: "antd",
    libraryDirectory: "es",
    style: "css"
  })
);
修改 package.json 的脚本
"dev": "react-app-rewired start",
"start": "react-app-rewired start",
"build": "react-app-rewired build",
"test": "react-app-rewired test"
直接引入组件 无需引入 css 文件
import { Button } from "antd";容器组件 VS 展示组件
基本原则:容器组件负责数据获取,展示组件负责根据 props 显示信息
优势
1、工作、展示分离
2、复用性高
3、更高的可用性
4、更易于测试
import React, { Component } from "react";

// 容器组件
export default class CommentList extends Component {
  constructor(props) {
    super(props);
    this.state = {
      comments: []
    };
  }
  componentDidMount() {
    setInterval(() => {
      this.setState({
        comments: [
          { body: "react is very good", author: "facebook" },
          { body: "vue is very good", author: "youyuxi" }
        ]
      });
    }, 1000);
  }
  render() {
    return (
      <div>
        {this.state.comments.map((c, i) => (
          <Comment key={i} data={c} />
        ))}
      </div>
    );
  }
}
// 展示组件
function Comment({data}){
  return (
    <div>
      <p>{data.body}</p>
      <p> --- {data.author}</p>
    </div>
  );
});
PureComponent 纯组件
定制了 shouldComponentUpdate 后的 Component(浅比较)
class Comp extends React.PureComponent {}
React.memo 纯组件(函数式写法)
React v16.6.0 之后的版本,可以使用 React.memo 让函数式的组件也有 PureComponent 的功能
// memo高阶组件
const Comment = React.memo(function(props) {
  console.log("render Comment"); //打印两次

  return (
    <div>
      <p>{props.body}</p>
      <p> --- {props.author}</p>
    </div>
  );
});
高阶组件
官网: https://react.docschina.org/docs/higher-order-components.html
在 React 里就有了 HOC(Higher-Order Components)的概念
高阶组件也是一个组件,但是他返回另外一个组件,产生新的组件可以对属性进行包装,甚至重写部分生命周期
import React, { Component } from "react";

// 一个简单组件
function Show(props) {
  return (
    <div>
      {props.stage}- {props.name}
    </div>
  );
}

// 高阶组件  接收一个组件 并 返回一个组件
const withShow = Comp => {
  const name = "高阶组件";

  // 简单形式
  // return props => <Comp {...props} name={name}></Comp>

  // 类形式  可以重写生命周期
  return class NewComp extends React.Component {
    componentDidMount() {
      console.log("do something");
    }

    render() {
      return <Comp {...this.props} name={name}></Comp>;
    }
  };
};

const NewShow = withShow(Show);

class Hoc extends Component {
  render() {
    return (
      <div>
        <NewShow stage="React"></NewShow>
      </div>
    );
  }
}

export default Hoc;
高阶组件链式调用
31 行
import React, { Component } from "react";

function Show(props) {
  return (
    <div>
      {props.stage}- {props.name}
    </div>
  );
}

const withShow = Comp => {
  const name = "高阶组件";

  return class NewComp extends React.Component {
    componentDidMount() {
      console.log("do something");
    }

    render() {
      return <Comp {...this.props} name={name}></Comp>;
    }
  };
};

const withLog = Comp => {
  console.log(Comp.name + "渲染了");
  return props => <Comp {...props}></Comp>;
};

// 可以链式调用 打印:Show渲染了 NewComp渲染了
const NewShow = withLog(withShow(withLog(Show)));

class Hoc extends Component {
  render() {
    return (
      <div>
        <NewShow stage="React"></NewShow>
      </div>
    );
  }
}

export default Hoc;
高阶组件装饰器写法
ES7 装饰器可用于简化高阶组件写法
yarn add react-app-rewired customize-cra
yarn add -D @babel/plugin-proposal-decorators
config-overrides.js 配置:
const {
  override,
  fixBabelImports,
  addDecoratorsLegacy
} = require("customize-cra");

module.exports = override(
  fixBabelImports("import", {
    libraryName: "antd",
    libraryDirectory: "es",
    style: "css"
  }),
  addDecoratorsLegacy({ legacy: true })
);
高阶组件装饰器写法:
// 高阶组件装饰器写法
import React, { Component } from "react";

const withShow = Comp => {
  const name = "高阶组件";

  return class NewComp extends React.Component {
    componentDidMount() {
      console.log("do something");
    }

    render() {
      return <Comp {...this.props} name={name}></Comp>;
    }
  };
};

const withLog = Comp => {
  console.log(Comp.name + "渲染了");
  return props => <Comp {...props}></Comp>;
};

// 修饰器进行修饰 应用组件直接使用 <Show></Show>
@withLog
@withShow
@withLog
class Show extends Component {
  render() {
    return (
      <div>
        {this.props.stage}- {this.props.name}
      </div>
    );
  }
}

// 修饰后这行代码就可以注释掉了
// const NewShow = withLog(withShow(withLog(Show)))

class Hoc extends Component {
  render() {
    return (
      <div>
        <Show stage="React"></Show>
      </div>
    );
  }
}

export default Hoc;
复合组件
import React from "react";

// Dialog作为容器不关心内容和逻辑
// 等同于vue中slot
function Dialog(props) {
  return (
    <div style={{ border: `4px solid ${props.color || "blue"}` }}>
      {props.children}
      <div className="footer">
        {/* 具名插槽 */}
        {props.footer}
      </div>
    </div>
  );
}

// WelcomeDialog通过复合提供内容
function WelcomeDialog(props) {
  return (
    <Dialog {...props}>
      <h1>欢迎光临</h1>
      <p>感谢使用react</p>
    </Dialog>
  );
}

const Api = {
  getUser() {
    return { name: "jerry", age: 20 };
  }
};

function Fetcher(props) {
  const user = Api[props.name]();
  return props.children(user);
}

function Filter({ children, type }) {
  return (
    <div>
      {React.Children.map(children, child => {
        if (child.type !== type) {
          return;
        }
        return child;
      })}
    </div>
  );
}

// 修改children
function RadioGroup(props) {
  return (
    <div>
      {React.Children.map(props.children, child => {
        //   vdom不可更改,克隆一个新的去改才行
        return React.cloneElement(child, { name: props.name });
      })}
    </div>
  );
}

function Radio({ children, ...rest }) {
  return (
    <label>
      <input type="radio" {...rest} />
      {children}
    </label>
  );
}

export default function() {
  const footer = <button onClick={() => alert("确定!")}>确定</button>;

  return (
    <div>
      {/* <WelcomeDialog color="green" footer={footer} /> */}
      {/* <Fetcher name="getUser">
        {({ name, age }) => (
          <p>
            {name}-{age}
          </p>
        )}
      </Fetcher> */}
      {/* 过滤器,可以过滤出指定标签类型 */}
      {/* <Filter type="p">
        <h1>react</h1>
        <p>react很不错</p>
        <h1>vue</h1>
        <p>vue很不错</p>
      </Filter> */}

      <RadioGroup name="mvvm">
        <Radio value="vue">vue</Radio>
        <Radio value="react">react</Radio>
        <Radio value="react">angular</Radio>
      </RadioGroup>
    </div>
  );
}
Hook
状态钩子 - State Hook
const [state, setState] = useState(initialState)
接收初始状态,返回一个状态变量和其更新函数
import React, { useState } from "react";
import { Button } from "antd";

function HookTest(props) {
  // din
  const [count, setCount] = useState(0);

  // 多个状态
  const [age] = useState(20);
  const [fruit, setFruit] = useState("banana");
  const [input, setInput] = useState("");
  const [fruits, setFruits] = useState(["apple", "banana"]);

  return (
    <div>
      <p>点击了{count}次</p>
      <Button onClick={() => setCount(count + 1)}>点击</Button>
      <hr />
      <p>年龄{age}</p>
      <p>水果{fruit}</p>
      <p>
        <input
          type="text"
          value={input}
          onChange={e => setInput(e.target.value)}
        />
        <Button onClick={() => setFruits([...fruits, input])}>添加</Button>
      </p>
      <ul>
        {fruits.map(f => (
          <li key={f} onClick={() => setFruit(f)}>
            {f}
          </li>
        ))}
      </ul>
    </div>
  );
}

export default HookTest;
副作用钩子 - Effect Hook
Effect Hook 可以让你在函数组件中执行副作用操作 (可以建多个)
副作用钩子会在每次渲染时都执行
// 副作用钩子会在每次渲染时都执行
useEffect(() => {
  document.title = `您点击了${count}`;
});
如果副作用钩子仅需要执行一次,传递第二个参数为空数组[]
// 副作用钩子会在每次渲染时都执行
useEffect(() => {
  console.log("api调用");
}, []);
钩子可以设置依赖,依赖更新 钩子才进行调用。可以设置多个依赖
//count更新了 钩子才执行
useEffect(() => {
  document.title = `您点击了${count}`;
}, [count]);

//设置多个依赖
useEffect(() => {
  document.title = `您点击了${count}`;
}, [count, a, b]);
自定义钩子 - Custom Hook
自定义 hook 是一个函数,名称用 use 开头,函数内部可以调用其他钩子
 //定义
function useAge() {
    const [age, setAge] = useState(0)
    useEffect(() => {
      setTimeout(() => {
        setAge(30)
      }, 2000)
    })
    return age
  }

  //使用
  const age = useAge()
  <p>年龄{age ? age : 'loading...'}</p>
其余钩子 TODO
组件跨层级通信
基本用法
创建上下文
const MyContext = React.createContext();提供上下文
const { Provider } = MyContext;
function Child(props) {
  return <div>child</div>;
}

function ContxtTest(props) {
  return (
    <div>
      <Provider value={{ foo: "bar" }}>
        <Child {...value}></Child>
      </Provider>
    </div>
  );
}
消费上下文
const { Provider, Consumer } = MyContext;

function Child(props) {
  return <div>child:{props.foo}</div>;
}

function ContxtTest(props) {
  return (
    <div>
      <Provider value={{ foo: "bar" }}>
        <Consumer>{value => <Child {...value} />}</Consumer>
      </Provider>
    </div>
  );
}
通信的三种方法
import React, { useContext } from "react";

//创建上下文
const MyContext = React.createContext();

// 方法一 Consumer
const { Provider, Consumer } = MyContext;

function Child(props) {
  return <div>child:{props.foo}</div>;
}

// 方法二 hook消费
function Child2() {
  const ctx = useContext(MyContext);
  return <div>child2:{ctx.foo}</div>;
}

// 方法三 使用class指定静态contentType

class Child3 extends React.Component {
  static contextType = MyContext;
  render() {
    return <div>child3:{this.context.foo}</div>;
  }
}

function ContxtTest(props) {
  return (
    <div>
      <Provider value={{ foo: "bar" }}>
        {/* 消费方法1:Consumer */}
        <Consumer>{value => <Child {...value} />}</Consumer>
        {/* 消费方法2:hook */}
        <Child2></Child2>
        {/* 消费方法3:contentType */}
        <Child3></Child3>
      </Provider>
    </div>
  );
}

export default ContxtTest;
高阶组件 example
import React, { Component } from "react";
import { Input, Button } from "antd";

// 创建一个高阶组件:扩展现有表单,事件处理、数据收集、校验
function MyFormCreate(Comp) {
  return class extends React.Component {
    constructor(props) {
      super(props);
      this.options = {};
      this.state = {};
    }

    handleChange = e => {
      const { name, value } = e.target;
      console.log(name, value);

      this.setState({ [name]: value }, () => {
        // 确保值发生变化再校验
        this.validateField(name);
      });
    };

    // 校验
    validateField = field => {
      // 获取校验规则
      const rules = this.options[field].rules;

      // 任意一项失败则返回false
      const ret = !rules.some(rule => {
        //   判断是否需要校验
        if (rule.require) {
          if (!this.state[field]) {
            // 校验失败
            this.setState({
              [field + "Message"]: rule.message
            });
            return true;
          }
        }
      });

      if (ret) {
        this.setState({
          [field + "Message"]: ""
        });
      }

      return ret;
    };

    // 校验所有字段
    validate = cb => {
      const rets = Object.keys(this.options).map(field => {
        return this.validateField(field);
      });

      const ret = rets.every(v => v === true);

      cb(ret, this.state);
    };

    // 创建input 包装器
    getFieldDec = (field, option) => {
      // 保存当前输入项的配置
      this.options[field] = option;

      return InputComp => (
        <div>
          {React.cloneElement(InputComp, {
            name: field,
            value: this.state[field],
            onChange: this.handleChange
          })}
          {/* 校验错误信息 */}
          {this.state[field + "Message"] && (
            <p style={{ color: "red" }}>{this.state[field + "Message"]}</p>
          )}
        </div>
      );
    };

    render() {
      // 通过 validate={this.validate} 将这个属性暴露给下面的组件
      return (
        <Comp getFieldDec={this.getFieldDec} validate={this.validate}></Comp>
      );
    }
  };
}

// 修饰器  使用高阶组件进行包装
@MyFormCreate
class RainForm extends Component {
  onSubmit = () => {
    console.log("onSubmit");
    // 校验所有字段
    this.props.validate((isValid, data) => {
      if (isValid) {
        console.log("登录成功", data);
      } else {
        console.log("登false");
      }
    });
  };

  render() {
    const { getFieldDec } = this.props;
    return (
      <div>
        {getFieldDec("uname", {
          rules: [{ require: true, message: "用户名必填" }]
        })(<Input />)}

        {getFieldDec("pwd", {
          rules: [{ require: true, message: "密码必填" }]
        })(<Input type="password" />)}

        <Button onClick={this.onSubmit}>login</Button>
      </div>
    );
  }
}

export default RainForm;
Redux
安装
yarn add redux react-redux基础使用
引入更新视图 src/index.js
import React from "react";
import ReactDOM from "react-dom";
import "./index.css";
import App from "./App";
import * as serviceWorker from "./serviceWorker";
import store from "./store";
// 引入 Provider 提供更新
import { Provider } from "react-redux";

ReactDOM.render(
  <Provider store={store}>
    <App />
  </Provider>,
  document.getElementById("root")
);
创建 store src\store\index.js
import { createStore } from "redux";

const counterReducer = (state = 0, action) => {
  switch (action.type) {
    case "add":
      return state + 1;
    case "minus":
      return state - 1;
    default:
      return state;
  }
};
const store = createStore(counterReducer);

export default store;
使用 src\components\redux-study\ReduxTest.jsx (两种不同写法)
import React from "react";

import { connect } from "react-redux";

const mapStateToProps = state => ({ num: state });
const mapDispatchToProps = {
  add: () => ({ type: "add" }),
  minus: () => ({ type: "minus" })
};

// 1、普通写法

function ReduxTest({ num, add, minus }) {
  return (
    <div>
      <p>{num}</p>
      <button onClick={add}>+</button>
      <button onClick={minus}>-</button>
    </div>
  );
}

export default connect(mapStateToProps, mapDispatchToProps)(ReduxTest);

// 2、装饰器写法

@connect(mapStateToProps, mapDispatchToProps)
class ReduxTest extends Component {
  render() {
    const { num, add, minus } = this.props;
    return (
      <div>
        <p>{num}</p>
        <button onClick={add}>+</button>
        <button onClick={minus}>-</button>
      </div>
    );
  }
}

export default ReduxTest;
redux 异步 redux-thunk
redux 只支持同步,实现异步任务需要中间件支持
安装
yarn add redux-thunk redux-logger配置
// + applyMiddleware 引入中间件函数
import { createStore, applyMiddleware } from "redux";
import logger from "redux-logger";
import thunk from "redux-thunk"; // 引入redux-thunk

const counterReducer = (state = 0, action) => {
  switch (action.type) {
    case "add":
      return state + 1;
    case "minus":
      return state - 1;
    default:
      return state;
  }
};
// +applyMiddleware(logger,thunk) thunk经过中间件处理
const store = createStore(counterReducer, applyMiddleware(logger, thunk));

export default store;
抽离 reducer 和 action
单独创建 count.redux.js 存储相关 reducer 和 action ,集中管理
// counter

// state
export const counterReducer = (state = 0, action) => {
  switch (action.type) {
    case "add":
      return state + 1;
    case "minus":
      return state - 1;
    default:
      return state;
  }
};

// action
export const add = () => ({ type: "add" });
export const minus = () => ({ type: "minus" });
export const asyncAdd = () => dispatch => {
  // 做异步操作
  setTimeout(() => {
    dispatch({ type: "add" });
  }, 2000);
};
index.js 中进行导入 并重命名 形成模块
import { createStore, applyMiddleware, combineReducers } from "redux";
import logger from "redux-logger";
import thunk from "redux-thunk";
//导入 counterReducer
import { counterReducer } from "./count.redux.js";

const store = createStore(
  combineReducers({ counter: counterReducer }), //重命名 counter 模块
  applyMiddleware(logger, thunk)
);

export default store;
在组件中使用
import { add, minus, asyncAdd } from "../../store/count.redux.js";

const mapStateToProps = state => ({ num: state.counter }); //state.模块名使用
const mapDispatchToProps = { add, minus, asyncAdd }; //引入action中的方法
Redux-Saga
redux-sage 使副作用(数据获取、浏览器缓存获取)易于管理、执行、测试和失败处理
安装
yarn add redux-saga使用
创建 src\store\sages.js
// call 调用异步函数
// put 通知状态更新
// takeEvery 负责监听action
import { call, put, takeEvery } from "redux-saga/effects";

// 模拟登录
const UserService = {
  login(uname) {
    return new Promise((resolve, reject) => {
      setTimeout(() => {
        if (uname === "Jerry") {
          resolve({ id: 1, name: "Jerry", age: 20 });
        } else {
          reject("用户名或密码错误");
        }
      }, 1000);
    });
  }
};

// worker Saga
function* login(action) {
  try {
    yield put({ type: "requestLogin" });
    const result = yield call(UserService.login, action.uname);
    yield put({ type: "loginSuccess", result });
  } catch (message) {
    yield put({ type: "loginFailure", message });
  }
}

function* mySaga() {
  yield takeEvery("login", login);
}

export default mySaga;
创建 src\store\user.redux.saga.js
export const userReducer = (
  state = { isLogin: false, loading: false, error: "" },
  action
) => {
  switch (action.type) {
    case "requestLogin":
      return { isLogin: false, loading: true, error: "" };
    case "loginSuccess":
      return { isLogin: true, loading: false, error: "" };
    case "loginFailure":
      return { isLogin: false, loading: false, error: action.message };
    default:
      return state;
  }
};
export function asyncLogin(uname) {
  return { type: "login", uname };
}
// export function login() {
//   return dispatch => {
//     dispatch({ type: "requestLogin" });
//     setTimeout(() => {
//       dispatch({ type: "login" });
//     }, 2000);
//   };
// }
修改 src\store\index.js
import { createStore, applyMiddleware, combineReducers } from "redux";
import logger from "redux-logger";
import { counterReducer } from "./count.redux.js";
import { userReducer } from "./user.redux.saga.js";

// 1、引入saga
import createSagaMiddleware from "redux-saga";
import mySaga from "./sagas";

// 2、创建saga中间件并注册
const sagaMiddleware = createSagaMiddleware();
const store = createStore(
  combineReducers({ counter: counterReducer, user: userReducer }),
  applyMiddleware(logger, sagaMiddleware)
);
// 3、中间件运行saga
sagaMiddleware.run(mySaga);

export default store;
react-router
安装
yarn add react-router-dom简单应用
需要<BrowserRouter></BrowserRouter>和<Switch></Switch>包裹
路由跳转:<Link to="/detail/web">Web架构师</Link>
路由视图:定义路径 path、显示组件 component、exact 完全配路径显示
<Route exact path="/about/me" component={() => <div>me</div>}></Route>
import React from "react";
import { BrowserRouter, Link, Route, Switch, Redirect } from "react-router-dom";
import { Button } from "antd";

function Home(params) {
  return (
    <div>
      <h3>课程列表</h3>
      <ul>
        <li>
          <Link to="/detail/web">Web架构师</Link>
        </li>
        <li>
          <Link to="/detail/python">Python架构师</Link>
        </li>
      </ul>
    </div>
  );
}
// 当前用户信息
function About(params) {
  return (
    <div>
      <h3>个人信息</h3>
      <div>
        <Link to="/about/me">个人信息</Link>||||
        <Link to="/about/order">订单信息</Link>
      </div>
      {/* Switch只显示一个 */}
      <Switch>
        <Route path="/about/me" component={() => <div>me</div>}></Route>
        <Route path="/about/order" component={() => <div>order</div>}></Route>
        <Redirect to="/about/me"></Redirect>
      </Switch>
    </div>
  );
}
function NoMatch({ location }) {
  return <div>404,地址{location.pathname}不存在</div>;
}

// 传递进来路由器对象
function Detail(props) {
  // 1\history 导航指令
  // 2\match 获取参数信息
  // 2\location 当前url信息
  console.log(props);

  return (
    <div>
      当前课程是:{props.match.params.course}
      <button onClick={props.history.goBack}>后退</button>
    </div>
  );
}

// 路由守卫
// 希望用法:<PrivaterRoute path="/about" component={}></PrivaterRoute>
function PrivaterRoute({ component: Comp, isLogin, ...rest }) {
  // 做认证
  // render 根据条件动态渲染组件
  return (
    <Route
      {...rest}
      render={props =>
        isLogin ? (
          <Comp></Comp>
        ) : (
          <Redirect
            to={{ pathname: "/login", state: props.location.pathname }}
          />
        )
      }
    ></Route>
  );
}

// 登录组件
function Login({ location, isLogin, Login }) {
  const redirect = location.state.redirect | "/";

  if (isLogin) {
    return <Redirect to={redirect}></Redirect>;
  }
  return (
    <div>
      <p>用户登录</p>
      <hr />
      <Button onClick={Login}>登录</Button>
    </div>
  );
}

function RouterExample(props) {
  return (
    <div>
      <BrowserRouter>
        <div>
          {/* 导航链接 */}
          <ul>
            <li>
              <Link to="/">首页</Link>
            </li>
            <li>
              <Link to="/about">关于</Link>
            </li>
          </ul>
          <Switch>
            {/* 路由配置:路由及组件 */}
            <Route exact path="/" component={Home}></Route>
            <Route path="/detail/:course" component={Detail}></Route>
            <PrivaterRoute path="/about" component={About} />
            <Route path="/login" component={Login}></Route>
            {/* 404:没有path 必然匹配 */}
            <Route exact component={NoMatch}></Route>
          </Switch>
        </div>
      </BrowserRouter>
    </div>
  );
}

export default RouterExample;
重定向
<Redirect to="/about/me"></Redirect>结合 redux 使用
import React from "react";
import { BrowserRouter, Link, Route, Switch, Redirect } from "react-router-dom";
import { Button } from "antd";
import { connect } from "react-redux";
import { asyncLogin } from "../store/user.redux.js";

function Home(params) {
  return (
    <div>
      <h3>课程列表</h3>
      <ul>
        <li>
          <Link to="/detail/web">Web架构师</Link>
        </li>
        <li>
          <Link to="/detail/python">Python架构师</Link>
        </li>
      </ul>
    </div>
  );
}
// 当前用户信息
function About(params) {
  return (
    <div>
      <h3>个人信息</h3>
      <div>
        <Link to="/about/me">个人信息</Link>||||
        <Link to="/about/order">订单信息</Link>
      </div>
      {/* Switch只显示一个 */}
      <Switch>
        <Route path="/about/me" component={() => <div>me</div>}></Route>
        <Route path="/about/order" component={() => <div>order</div>}></Route>
        <Redirect to="/about/me"></Redirect>
      </Switch>
    </div>
  );
}
function NoMatch({ location }) {
  return <div>404,地址{location.pathname}不存在</div>;
}

// 传递进来路由器对象
function Detail(props) {
  // 1\history 导航指令
  // 2\match 获取参数信息
  // 2\location 当前url信息
  console.log(props);

  return (
    <div>
      当前课程是:{props.match.params.course}
      <button onClick={props.history.goBack}>后退</button>
    </div>
  );
}

// 路由守卫
// 希望用法:<PrivaterRoute path="/about" component={}></PrivaterRoute>
// redux第一个更改
const PrivaterRoute = connect(state => ({ isLogin: state.user.isLogin }))(
  ({ component: Comp, isLogin, ...rest }) => {
    // 做认证
    // render 根据条件动态渲染组件
    return (
      <Route
        {...rest}
        render={props =>
          isLogin ? (
            <Comp></Comp>
          ) : (
            <Redirect
              to={{
                pathname: "/login",
                state: { redirect: props.location.pathname }
              }}
            />
          )
        }
      ></Route>
    );
  }
);

// 登录组件
const Login = connect(
  state => ({
    isLogin: state.user.isLogin,
    loading: state.user.loading
  }),
  { asyncLogin }
)(function Login({ location, isLogin, asyncLogin, loading }) {
  const redirect = location.state.redirect || "/";

  if (isLogin) {
    return <Redirect to={redirect} />;
  }
  return (
    <div>
      <p>用户登录</p>
      <hr />
      <Button onClick={asyncLogin} disabled={loading}>
        {loading ? "登录中..." : "登录"}
      </Button>
    </div>
  );
});

function RouterExample(props) {
  return (
    <div>
      <BrowserRouter>
        <div>
          {/* 导航链接 */}
          <ul>
            <li>
              <Link to="/">首页</Link>
            </li>
            <li>
              <Link to="/about">关于</Link>
            </li>
          </ul>
          <Switch>
            {/* 路由配置:路由及组件 */}
            <Route exact path="/" component={Home}></Route>
            <Route path="/detail/:course" component={Detail}></Route>
            <PrivaterRoute path="/about" component={About} />
            <Route path="/login" component={Login}></Route>
            {/* 404:没有path 必然匹配 */}
            <Route exact component={NoMatch}></Route>
          </Switch>
        </div>
      </BrowserRouter>
    </div>
  );
}

export default RouterExample;